So, unless I bake something new before Christmas, there will most likely not be any posts until after Christmas. This is because the crafts I will be working on between now and then are things that are going to be given as Christmas gifts and I don't want to risk the recipients finding out about them.
I will most likely write the posts as I make them, but will set them to not be published until the day after Christmas or in the week following.
Sorry for the lack of posts until then.
December 12, 2012
December 8, 2012
Shame on Me...
I realize that I have not posted in quite a while, but life gets hectic around the holidays. Because of this, I haven't been baking very many new recipes.
For Thanksgiving, I made a Turkey Cheese Ball found on the Taste of Home website. I made the same thing last year, but this year I decided to be lazy and didn't decorate it as a turkey like the picture shows.
I find it easiest to put the cream cheese, turkey, cheddar cheese, and onion in my Cuisinart Mini-Prep Plus Chopper (one at a time, dumping into a medium bowl to mix all ingredients together). By doing this, you are making sure the pieces are all the same size so there aren't chunks in the cheese ball.
When it comes to actually forming the cheese ball, it is easiest to take a bowl that is rounded and line it with plastic wrap. I have found that it really only takes two pieces of plastic wrap that have been criss-crossed. After you have done this, spoon your cheese ball into the bowl, pull the edges of the plastic wrap around the ball, and then place in the fridge.
For Thanksgiving, I made a Turkey Cheese Ball found on the Taste of Home website. I made the same thing last year, but this year I decided to be lazy and didn't decorate it as a turkey like the picture shows.
 |
| Turkey Cheese Ball as seen on Taste of Home website - Photo Credit to Taste of Home |
When it comes to actually forming the cheese ball, it is easiest to take a bowl that is rounded and line it with plastic wrap. I have found that it really only takes two pieces of plastic wrap that have been criss-crossed. After you have done this, spoon your cheese ball into the bowl, pull the edges of the plastic wrap around the ball, and then place in the fridge.
Earlier tonight, I made The Busty Baker's Orange Spritz Cookies. They are quite good. Unlike the picture below, mine are in the shape of Christmas Trees because they are for a Christmas get-together.
 |
| Orange Spritz Cookies - Photo Credit to The Busty Baker |
In her recipe, The Busty Baker said that if the dough is too sticky, you should stick it in the fridge for about 10 minutes. I highly suggest doing this as it makes a huge difference. Make sure to do it in between batches or the dough will soften up in the time that the cookies are baking.
I sprinkled mine with some sugar to give them a little extra something. Also, rather than using 1/4 tsp orange extract, I used about 1 1/2 teaspoons of juice from the orange that I zested. (Don't worry, I didn't waste the rest of the juice; I poured it into the pitcher of orange juice that was in the fridge.) The directions also say to use an electric mixer, but sadly I don't have one so I just used a hand mixer.
For the Christmas get-together, I also made snow men candy bars as seen on the blog "Rock Paper Cricut" using Hershey bars. On the blog, they stamped the faces on, but I just used Sharpies and drew them on. For the cheeks, rather than chalking them on, I used a Q-Tip and blush.
 |
| Snowmen as seen on Rock Paper Cricut - Photo Credit to Rock Paper Cricut |
I have a few Christmas gifts that I am making and will hopefully write a post about them. I'm not entirely sure when that will be though because I am waiting for some of the supplies I ordered to get here. They're supposed to be here sometime next week. Utnil then, happy baking (and crafting)!
"SANTA! OH MY GOD! SANTA'S COMING! I KNOW HIM! I KNOW HIM!"
-Buddy the Elf from Elf
November 19, 2012
Andes Mint Doodles
You know those super delicious Thin Mint cookies that the Girl Scouts sell? They're great, but they only sell them once a year. Even if you buy a few boxes planning to eat one and put the others in the cupboard for later, they're not going to last more than a month or two (that's if you manage to not eat the entire first box the day you buy them).
Well, Andes Mint Doodles to the rescue! These taste almost exactly like them. These are a softer cookie whereas Thin Mints are a crispy cookie, so these are great for dipping in a glass of cold milk (the best way to eat most cookies). they also aren't coated in chocolate so you don't risk having them melt on your hands making them all sticky.
------------------------------
2 1/4 c. all-purpose flour, sifted
3/4 c. cocoa, sifted
1/2 tsp. baking soda
1/2 tsp. salt
1/2 c. shortening
1/2 c. unsalted butter, softened
3/4 c. sugar
3/4 c. dark brown sugar, firmly packed
2 large eggs, beaten
2 tsp. vanilla
10 oz. bag Andes Crème de Menthe Baking Chips
1 c. powdered sugar
1. Pre-heat oven to 350 degrees.
2. Sift the flour, cocoa, baking soda and salt together into
a bowl and set aside.
3. With a hand held or standing mixer, beat together the
shortening and butter until creamy. Add the sugars and continue beating until
light and fluffy. Add the eggs and vanilla and beat until thoroughly
incorporated. Add the flour mixture and blend until smooth. Fold in Andes Crème
de Menthe Baking Chips.
4. Roll the dough, by hand, into a 1 1/2 inch balls*. Roll the
balls in the powdered sugar to fully cover ball**. Flatten the balls gently into 1/2” thick disks and place about 2” apart, spacing them evenly on un-greased
baking sheets. Bake cookies at 350 degrees for 10-12*** minutes. Remove from oven
and let cookies set 1 minute on baking sheet. Remove from sheet and move to
wire rack to cool completely.
* I used an ice cream scoop so I only had to roll the dough a little bit.
** I just used a 2 cup measuring cup filled with 1 c powdered sugar to do this.
***Mine took about 11 minutes.
------------------------------
The only thing I don't like about these cookies is that with them being chocolate, you can't go with the "until golden brown" rule since they're already dark brown. Another thing that kind of freaked me out was that the chocolate mint almost smelled like the cookies were burnt (they weren't).
Letting them set for 1 minute before transferring to a rack is essential. If you don't, they will fall apart as you try to transfer them.
I don't think you can screw these cookies up; apart from forgetting to turn the oven on or forgetting to set the timer.
These things are delicious. I think about 1/4 of them have been eaten and I only finished making them a little over an hour ago.
Now, it's time for pictures! (Sorry for the poor quality of the pictures; they were taken with my iPod.)
 |
| Flattened and ready to go in the oven. |
 |
| Out of the oven and cooling off. (Of course a few were eaten before they were finished cooling.) |
"'C' is for cookie that's good enough for me,
Oh! cookie, cookie, cookie starts with 'C'!"
Oh! cookie, cookie, cookie starts with 'C'!"
-Cookie Monster
November 13, 2012
Lasagna Cupcakes
I know, I know, it's been a while since I've actually posted something to eat. However, I have a good excuse. I've been going through all my issues of the cooking magazines that I get (Food Network, Rachael Ray, and Taste of Home) ripping out the recipes that look good so I could recycle the actual magazines and have more room in my bedroom. I ended up with a stack about four inches tall and have started to type the recipes up so I can put them in my recipe binder. I have a feeling that I am going to have to buy another binder (this will be my third).
These lasagna cupcakes are adapted from a Betty Crocker recipe that can be found here. They can be eaten by themselves, but are also great with a side salad and/or garlic bread. To make them:
6 lasagna noodles, cooked and drained, cut in half
1 1/2 c Tomato pasta sauce (I use homemade spaghetti sauce.)
1 container (15 oz) ricotta cheese
1 tsp oregano
1/2 tsp garlic powder
1/4 tsp salt
1 egg
1/2 c shredded mozzarella cheese
2 T grated Parmesan cheese
1. Preheat oven to 350 degrees. Spray jumbo muffin tin with non-stick cooking spray.
2. In a medium bowl, mix ricotta cheese, oregano, garlic powder, salt, and egg.
3. Line each muffin cup with 2 lasagna noodle halves, crossing the noodles to make an "x." The noodles will come up the side of the cup. Spoon about 1 T pasta sauce over the noodles.
4. Spoon about a half cup of the ricotta mixture over the sauce and then put about 3 T pasta sauce on top of that. Top with mozzarella and Parmesan cheeses. Cover with foil.
5. Bake for 35 minutes, turning at least once during baking. Take off the foil and let it bake for about five more minutes or until the cheese is melted. Let stand for 10 minutes. Remove and serve.
These lasagna cupcakes are adapted from a Betty Crocker recipe that can be found here. They can be eaten by themselves, but are also great with a side salad and/or garlic bread. To make them:
------------------------------
Lasagna Cupcakes
1 1/2 c Tomato pasta sauce (I use homemade spaghetti sauce.)
1 container (15 oz) ricotta cheese
1 tsp oregano
1/2 tsp garlic powder
1/4 tsp salt
1 egg
1/2 c shredded mozzarella cheese
2 T grated Parmesan cheese
1. Preheat oven to 350 degrees. Spray jumbo muffin tin with non-stick cooking spray.
2. In a medium bowl, mix ricotta cheese, oregano, garlic powder, salt, and egg.
3. Line each muffin cup with 2 lasagna noodle halves, crossing the noodles to make an "x." The noodles will come up the side of the cup. Spoon about 1 T pasta sauce over the noodles.
4. Spoon about a half cup of the ricotta mixture over the sauce and then put about 3 T pasta sauce on top of that. Top with mozzarella and Parmesan cheeses. Cover with foil.
5. Bake for 35 minutes, turning at least once during baking. Take off the foil and let it bake for about five more minutes or until the cheese is melted. Let stand for 10 minutes. Remove and serve.
------------------------------
The original recipe has you mix cooked spinach into the ricotta cheese mixture, but I can't stand cooked spinach (raw only, please) so I don't use it.
These can be a meal in themselves, but you'll most likely want to have a dessert on hand because there is a possibility that you will get hungry later.
This last time that I made them, there were 8 lasagna noodles in the box so rather than putting the box back in the cupboard with two noodles, I made a mini lasagna in a mini loaf pan.
They reheat quite well, so Dad and Rachel usually take the leftovers for lunch the next day.
I didn't think to take a picture of them (we were too hungry), so the picture below is the one from the Betty Crocker website and looks quite a bit different because it has the spinach in it.
 |
| Photo credit: Betty Crocker website |
November 4, 2012
Hanging Initials
With this post, I am trying out the whole schedule thingy where I write the post now and it publishes at a time that I tell it to. The reason I am doing this is because I made these for Rachel's birthday present. If I were to post it now when I am making it, there is a possibility (although very slight because I highly doubt she even reads my blog even though I have asked her to do so countless times) that she will see it and the surprise will be ruined.
I don't recall seeing this on Pinterest, but if I did and the author of the blog or whatever that originally came up with this happens to run across this post, I apologize if it seems as though I am taking this and claiming it as my own. I actually think that it is a combination of several pins.
I purchased the things needed to make these at Craft Warehouse, but I would assume that other places like Michael's and JoAnn would have them too. To make them you will need:
Scrapbook paper (one for every letter unless using smaller letters)
Adhesive Spray
X-acto Knife
Rhinestones
Tacky Glue (or something similar)
Toothpick
Picture Hangers (I used ones that were referred to as "Triangular Hangers.")
Hot Glue Gun
Newspaper (to keep your work surface clean)
Large, heavy book (I used "Munschworks" since it was nearby.)
Lay out the newspaper over your work surface so it doesn't get all sticky from the spray.
Spray the letter with a good coating of Adhesive Spray. Also spray the wrong side (the side that you do not want showing) of the scrapbook paper lightly.
Place the letter on the paper sticky side down. On top of this, place a sheet of newspaper and your heavy book. (You probably don't need the sheet of newspaper, but I did it to be safe so that my book would not accidentally stick to my letter.)
Let the letter set for a few minutes until the letter is dry.
Once the letter is dry, turn it paper side down on your work surface. Using the X-acto Knife, cut out around the edges of the letter.
After cutting around the edges of the letter, flip over and use the X-acto Knife to cut all the way through the paper.
Arrange the rhinestones on the letter however you would like (arrange without glue first so you don't make a commitment until you are sure you like where they are all placed).
Using a toothpick, place small drops of glue where you would like to place the rhinestones. (I found that the easiest way to pick up the rhinestones is to lick your finger and then press down on the rhinestone.)
Allow the Tacky Glue to completely dry (I left mine overnight.)
Using a hot glue gun, attach the picture hangers to the back of your letters. (My letters had plastic hanger thingies on them for when they were in the store that I had removed before working with them; this is where I attached my picture hangers.)
Hang up your letters and enjoy!
Note: The instructions for how to attach the paper to the letters go along with the directions on my can of Adhesive Spray. You may want to check your can to make sure that they are the same.
I don't recall seeing this on Pinterest, but if I did and the author of the blog or whatever that originally came up with this happens to run across this post, I apologize if it seems as though I am taking this and claiming it as my own. I actually think that it is a combination of several pins.
I purchased the things needed to make these at Craft Warehouse, but I would assume that other places like Michael's and JoAnn would have them too. To make them you will need:
------------------------------
Unpainted MDF LettersScrapbook paper (one for every letter unless using smaller letters)
Adhesive Spray
X-acto Knife
Rhinestones
Tacky Glue (or something similar)
Toothpick
Picture Hangers (I used ones that were referred to as "Triangular Hangers.")
Hot Glue Gun
Newspaper (to keep your work surface clean)
Large, heavy book (I used "Munschworks" since it was nearby.)
Lay out the newspaper over your work surface so it doesn't get all sticky from the spray.
Spray the letter with a good coating of Adhesive Spray. Also spray the wrong side (the side that you do not want showing) of the scrapbook paper lightly.
Place the letter on the paper sticky side down. On top of this, place a sheet of newspaper and your heavy book. (You probably don't need the sheet of newspaper, but I did it to be safe so that my book would not accidentally stick to my letter.)
Let the letter set for a few minutes until the letter is dry.
Once the letter is dry, turn it paper side down on your work surface. Using the X-acto Knife, cut out around the edges of the letter.
After cutting around the edges of the letter, flip over and use the X-acto Knife to cut all the way through the paper.
Arrange the rhinestones on the letter however you would like (arrange without glue first so you don't make a commitment until you are sure you like where they are all placed).
Using a toothpick, place small drops of glue where you would like to place the rhinestones. (I found that the easiest way to pick up the rhinestones is to lick your finger and then press down on the rhinestone.)
Allow the Tacky Glue to completely dry (I left mine overnight.)
Using a hot glue gun, attach the picture hangers to the back of your letters. (My letters had plastic hanger thingies on them for when they were in the store that I had removed before working with them; this is where I attached my picture hangers.)
Hang up your letters and enjoy!
Note: The instructions for how to attach the paper to the letters go along with the directions on my can of Adhesive Spray. You may want to check your can to make sure that they are the same.
------------------------------


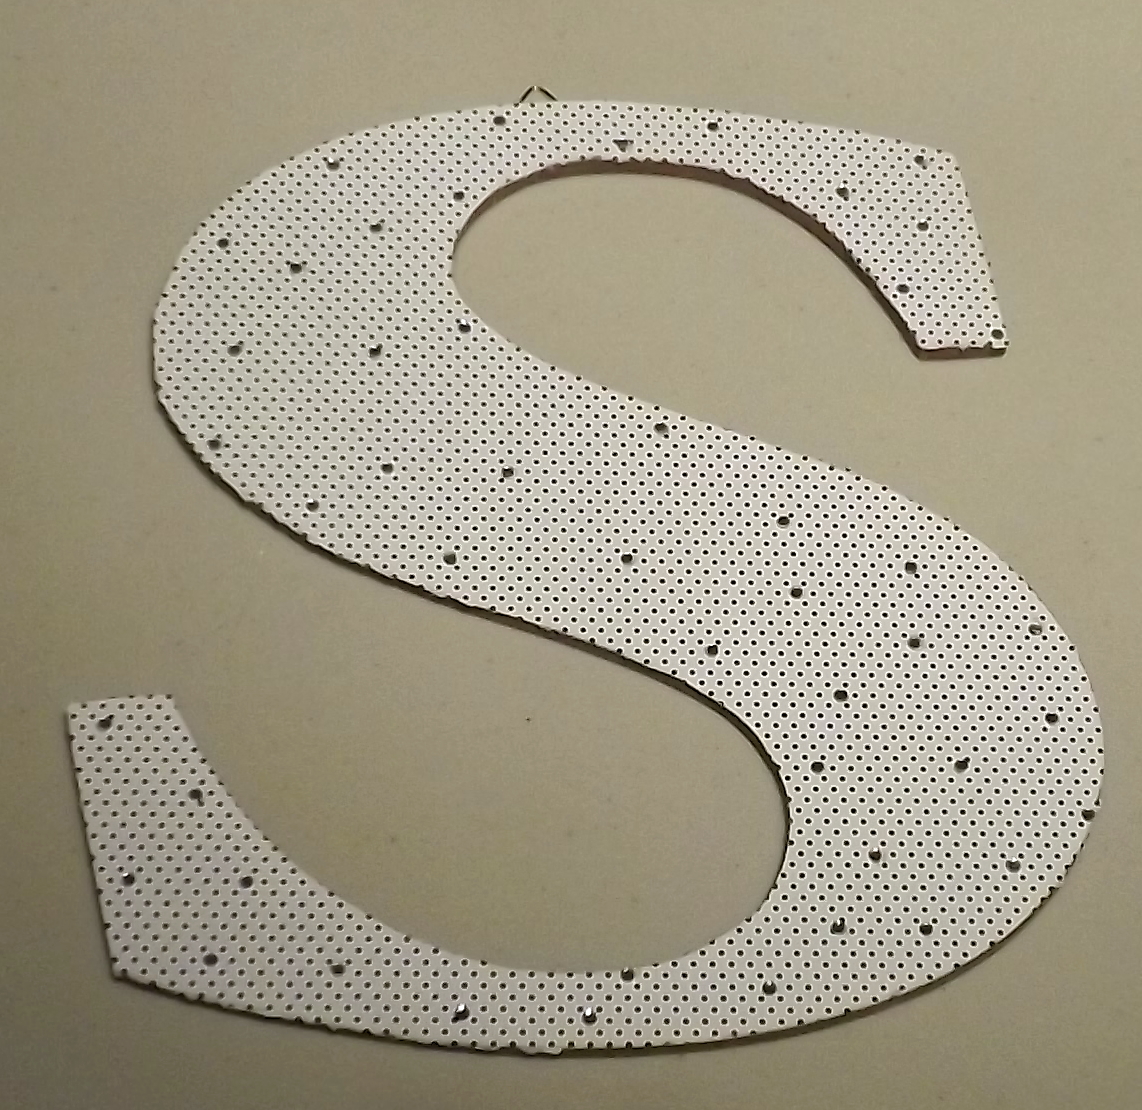
 |
| This is what the letters look like prior to attaching the paper. |
 |
| These are what my hangers looked like. I did not use the screws as the letters were too thin. |
 |
| My rhinestones are clear, but this is basically what they look like. |
The final product:


I haven't given these to her yet so I have no idea where she is going to hang them. Hopefully she likes them. I'll give you an update after she puts them up.
"What's in a name? That which we call a rose
By any other name would smell as sweet."
By any other name would smell as sweet."
- Juliet in Shakespeare's "Romeo and Juliet"
October 26, 2012
Garlic Cheese Twists
Last night we had spaghetti and rather than having the usual garlic toast, I decided to make the Garlic-Cheese Twists that I found a recipe online for. (I apologize that I cannot remember where I found it so if the person who originally posted this sees this, would you please provide a link in the comments and I will update the posting giving you credit.)
To make the twists:
2 1/2 tsp Active Dry Yeast
1 T Granulated Sugar
1 1/2 tsp Salt
1 1/4 cups warm Water
1 T Extra Virgin Olive Oil*
1 clove Garlic, minced
Cheddar Cheese
Extra Virgin Olive Oil for brushing
Spray two baking sheets with non-stick cooking spray.
Combine half of the flour (1 1/2 cups) with yeast, sugar, and salt in a large bowl. Add warm water and oil. Beat on medium speed until smooth, about 4 minutes.
Stir in garlic and as much of the remaining flour needed to make a stiff dough.
Turn dough out onto a floured surface and knead until smooth and elastic.
Divide dough into fourths (I used a pizza cutter). Shape each portion into a ball and then divide each ball into ten portions. Shape each of these portions into a stick.
For each twist, brush one stick with water and twist with another stick. Make sure to press together at the ends so they stay together.
Arrange all the twists on the baking sheets about two inches apart.
Brush twists with olive oil and sprinkle with Cheddar cheese.
Cover and let rise in a warm, draft-free place for about 50 minutes. (I put mine in the oven with the light turned on, a tip that I learned on Pinterest.)
Preheat oven to 400 degrees.
Bake until lightly browned, 12 to 15 minutes. Serve warm.
*The original recipe calls for Canola Oil, but I live Extra Virgin Olive Oil better and think it provides a better flavor.
The consensus? They need more garlic. You can hardly tell that there is any in there. This is most likely due to the fact that fresh garlic is not as potent as granulated garlic. Next time I make them (and there will be a next time), I am going to use two cloves of garlic and possibly sprinkle a little bit on top of the twists along with the cheese.
Dad said that he liked how they were kind of crispy on the bottom. Mom said that was what she didn't like about them. So, next time, one pan will be baked a little less so Mom can have breadsticks that are not at all crispy.
And Rachel? It's bread and cheese, two of her favorite foods, so there was no question about whether or not she liked them. No, the question was how many she would eat. I didn't count how many, so I can't tell you, but I do know that she ate one right as they came out of the oven, at at least one at dinner , and took at least one in her lunch today.
I reheated one to have with my lunch today and they are still as good as they were last night.
To make the twists:
----------------------------
3 cups All-Purpose Flour2 1/2 tsp Active Dry Yeast
1 T Granulated Sugar
1 1/2 tsp Salt
1 1/4 cups warm Water
1 T Extra Virgin Olive Oil*
1 clove Garlic, minced
Cheddar Cheese
Extra Virgin Olive Oil for brushing
Spray two baking sheets with non-stick cooking spray.
Combine half of the flour (1 1/2 cups) with yeast, sugar, and salt in a large bowl. Add warm water and oil. Beat on medium speed until smooth, about 4 minutes.
Stir in garlic and as much of the remaining flour needed to make a stiff dough.
Turn dough out onto a floured surface and knead until smooth and elastic.
Divide dough into fourths (I used a pizza cutter). Shape each portion into a ball and then divide each ball into ten portions. Shape each of these portions into a stick.
For each twist, brush one stick with water and twist with another stick. Make sure to press together at the ends so they stay together.
Arrange all the twists on the baking sheets about two inches apart.
Brush twists with olive oil and sprinkle with Cheddar cheese.
Cover and let rise in a warm, draft-free place for about 50 minutes. (I put mine in the oven with the light turned on, a tip that I learned on Pinterest.)
Preheat oven to 400 degrees.
Bake until lightly browned, 12 to 15 minutes. Serve warm.
*The original recipe calls for Canola Oil, but I live Extra Virgin Olive Oil better and think it provides a better flavor.
----------------------------
 |
| Before raising. They get bigger, but don't quite double. (I forgot to take a picture after they rose.) |
 |
| Fresh out of the oven. |
Dad said that he liked how they were kind of crispy on the bottom. Mom said that was what she didn't like about them. So, next time, one pan will be baked a little less so Mom can have breadsticks that are not at all crispy.
And Rachel? It's bread and cheese, two of her favorite foods, so there was no question about whether or not she liked them. No, the question was how many she would eat. I didn't count how many, so I can't tell you, but I do know that she ate one right as they came out of the oven, at at least one at dinner , and took at least one in her lunch today.
I reheated one to have with my lunch today and they are still as good as they were last night.
"Tomatoes and oregano make it Italian; wine and tarragon make it French.
Sour cream makes it Russian; lemon and cinnamon make it Greek. Soy sauce
makes it Chinese; garlic makes it good."
- Alice May Brock
October 17, 2012
Blueberry Lemon Muffins
Mom had promised all summer long that she would make a batch of Blueberry Lemon Muffins. She never did, so I decided that I would make them. This is my first time making them so I am hoping that they are going to turn out as good as her's. To make Blueberry Lemon Muffins:
------------------------------
Blueberry Lemon Muffins
Makes 12 muffins.*
2 eggs
1/2 c melted butter
1 c sugar
1 c plain yogurt
2 c flour
1 tsp baking powder
1/2 tsp baking soda
1 tsp lemon zest**
1 c blueberries***
Preheat oven to 375 degrees.
Beat together eggs, melted butter, and sugar.
Stir in yogurt.
Add dry ingredients just until blended.
Fold in lemon zest and blueberries.
Spoon batter into muffin tins that have been sprayed with non-stick cooking spray.
Bake 25 minutes or until a toothpick that has been inserted in the middle of a few of the muffins comes out clean.****
*This is what the recipe I used says, but I found that there was more batter after filling the 12 muffin cavities in the muffin tin so I put the extra in a mini loaf pan and made a mini loaf of Blueberry Lemon Bread.
**I am of the mindset that you can never have enough lemon, so I just added the zest of a whole lemon.
***A tip that I learned a while ago is that when using berries, chocolate chips, nuts, etc. in a recipe, toss them in flour before adding to the batter. This will prevent them from sinking to the bottom of whatever it is that you are making. I know it sounds like an old wives' tale, but it really does work.
****My muffins were done after 20 minutes and the mini loaf after 25.
------------------------------
I would be eating one right now, but since they just came out of the oven, I have a feeling that I would not be able to enjoy it as much as I would like and would burn my mouth. They do smell delicious.
 |
| Melted butter, eggs, and sugar. Look how nice and yellow it is from farm fresh eggs. |
 |
| Yogurt has already been stirred in. This is before the dry ingredients have been added. |
 |
| With the lemon zest and blueberries. |
 |
| This is how I floured my blueberries. I put a little bit of flour in the measuring cup and then added the blueberries and stirred with a spoon. |
 |
| In the muffin tin pre baking. |
 |
| In the muffin tin post baking. |
You have no idea how good these smell right now, but I am being good and restraining myself from eating one... for now.
Two muffins were sitting in an oven.
One muffin said to the other, "Ooh, gettin' a bit hot in here don't you think?"
The other backed away in surprise, "Oh My God!! A Talking Muffin!!"
One muffin said to the other, "Ooh, gettin' a bit hot in here don't you think?"
The other backed away in surprise, "Oh My God!! A Talking Muffin!!"
October 15, 2012
Easy Breezy Waffles
Sometimes when we have our cased pork sausage for dinner, we will have waffles with it. They are extremely easy to make and very delicious. To make them:
3 tsp baking powder
1/2 tsp salt
2 beaten egg yolks
1 c. milk
1/2 c. cream*
2 egg whites, beaten until stiff peaks form
Sift dry ingredients together.
Combine egg yolks, milk, and cream; stir into dry ingredients.
Fold in egg whites leaving a few fluffs - do not over mix.
Bake in preheated waffle iron.
Makes about 5 waffles depending on how big you make them.
*I usually use Heavy Whipping Cream, but Half and Half works too.
------------------------------
Easy Breezy Waffles
1 3/4 c. flour3 tsp baking powder
1/2 tsp salt
2 beaten egg yolks
1 c. milk
1/2 c. cream*
2 egg whites, beaten until stiff peaks form
Sift dry ingredients together.
Combine egg yolks, milk, and cream; stir into dry ingredients.
Fold in egg whites leaving a few fluffs - do not over mix.
Bake in preheated waffle iron.
Makes about 5 waffles depending on how big you make them.
*I usually use Heavy Whipping Cream, but Half and Half works too.
------------------------------
I think it is nearly impossible to mess these up (unless you forget to plug in the waffle iron or forget the waffle in the waffle iron). I like to put butter, applesauce (homemade of course), and cream on mine. They are also good with the traditional butter and maple syrup.
 |
| Dry Ingredients |
 |
| Egg Yolks, Milk, and Cream |
 |
| Beaten Egg Whites |
 |
| Wet ingredients have been added and egg whites have been folded in. As stated in the recipe, make sure to leave some fluffs. This makes your waffles nice and fluffy. |
 |
| Waffle!!! Yum! |
As you can see, I did not take a picture of my waffle on my plate with the applesauce and cream... I kind of forgot until after I had eaten most of it. Oops.
"We can stay up late, swapping manly stories, and in the morning, I'm making waffles!"
- Donkey from "Shrek"
October 6, 2012
Hamburger Pizza
Mmm... Pizza. Who doesn't like pizza? Seriously. The nice thing about pizza is that you can pretty much put anything on it that you want. And if you make it with a sugar cookie crust, it can be a dessert pizza.
This pizza dough is super easy to make and can also be used to make calzones. To make it:
3 ¼ to 3 ¾ c flour
2 ¼ tsp. yeast
1 ½ tsp. salt
1 ¼ c warm water
3 T oil
2 tsp. oregano
¾ tsp. salt
1/8 tsp. garlic
1/8 tsp. pepper
This pizza dough is super easy to make and can also be used to make calzones. To make it:
------------------------------
3 ¼ to 3 ¾ c flour
2 ¼ tsp. yeast
1 ½ tsp. salt
1 ¼ c warm water
3 T oil
In large bowl, combine 1 ½ c flour, yeast, and salt.
Add warm
water and oil.
Blend at low speed until moist.
Beat 3 minutes a medium speed.
By hand stir in enough flour to make firm dough.
Knead 3-5 minutes.
Cover dough
with plastic wrap or a warm towel. Let rise 20 minutes.
------------------------------
This can be topped with whatever pizza toppings your heart desires. This time, I topped ours with:
Hamburger (fried with chopped onion and seasoned with salt and pepper),
Canadian Bacon,
Olives (cut up into fourths),
Shredded Cheese (mozzarella and cheddar), and
Pineapple Chunks.
To make the pizza, make the dough from the recipe above. After it has risen for 20 minutes, stretch it out onto pizza sheet that has been sprayed with non-stick cooking spray. You can also use a cookie sheet or make personal sized pizzas using pie plates.
The sauce can either be homemade or store-bought. (I used store bought this time because I totally forgot about making the sauce and everyone was getting hungry.) To make pizza sauce:
------------------------------
1 8oz can tomato sauce2 tsp. oregano
¾ tsp. salt
1/8 tsp. garlic
1/8 tsp. pepper
Combine the above ingredients and stir well. It is a good idea to make it prior to starting the pizza dough so the flavors have a chance to incorporate better. It also works fine to make it and use it right away.
------------------------------
After putting all the toppings you want on your pizza, put it in a 425 degree oven for 20-25 minutes or until the crust is golden brown on both the edges and the bottom. Check on the pizza a couple times while it is baking and rotate it to make sure that the pizza is cooked evenly. Let the pizza set for a few minutes before cutting it or you will have a problem with all of your toppings wanting to fall off.
To make calzones, make the pizza dough from the above recipe. When we have calzones, they are usually filled with the same things that we put on hamburger pizza minus the pineapple (it is too juicy to put in them). However, you can fill it with you want. When my cousin makes them, she fills them with sausage (fried and seasoned with salt and pepper), pepperoni, olives, and cheese.
Break off a section of the pizza dough and stretch it into a circle that is about 5 inches across (unless you want to make mini calzones, but those are a lot of work). Place your fillings on one half of the dough. Fold over the other half of the dough and press the edges together to seal. Place on a pizza sheet or cookie sheet that have been sprayed with non-stick cooking spray. Bake in a 425 degree oven for 20-25 minutes or until they are golden brown. Make sure to rotate the pan at least once to ensure even baking.
Other variations we have used this pizza dough recipe for are:
BBQ Chicken Pizza - BBQ Sauce instead of Pizza Sauce with two chicken breasts that have been seasoned with salt and pepper, cooked in a pan, and then chopped up (we use a Pampered Chef Food Chopper).
Honey Chipolte Pizza - Foster Farms Honey Chipolte Chicken Breasts (we buy them from Costco) that have been cooked in a pan and chopped up. For this one, we still have not decided if we like it better with Olive Oil or normal Pizza Sauce.
And now... Pictures!!!!!!!
 |
| The dry ingredients |
 |
| This is what it looks like after you have added the wet ingredients and mixed it for 3 minutes. |
 |
| After adding the wet ingredients, you slowly begin to work in the rest of your flour. This is what it looks like when it starts to come together. |
 |
| Kneading the dough. A very important step. |
 |
| After the dough has been kneaded and returned to the bowl. |
 |
| Twenty minutes later, your dough will have at least doubled in size. It does better if there is no draft. I like to cover mine with plastic as well as a light towel that I have put in the microwave for about 20 seconds. |
 |
| Stretch out the dough onto your pizza sheet that has been sprayed with non-stick cooking spray. |
 |
| Add your toppings. |
 |
| After coming out of the oven. |
The nice thing about making your own pizza rather than getting delivery, somewhere like Papa Murphys, or buying a frozen one is that you get to control what you have on your pizza and how much of everything you want on it. This helps to please everyone who eats it. For example, my sister does not like pineapple, so there is no pineapple on 1/4 of this pizza and my cousin who was there for dinner does not like olives (crazy kid) so there are no olives on 1/4 of the pizza. In the end, everyone is happy and no one ends up with a pile of toppings on their plate because they are things that they do not like.
"Pizza. Great equalizer. Rich people love pizza. Poor people love pizza. White people love pizza. Black people love pizza."
-Michael Scott - "The Office"
Subscribe to:
Posts (Atom)